Artisanal Restoration for Your Fine Surfaces
We bring tile, grout, and sanitary sealants back to pristine condition using advanced materials and expert precision. Trust the details to professionals.
Our Core Specialties
Whether it is refreshing moldy bathroom caulk or reviving high-traffic floor tiles, we treat every line and joint as a work of art.
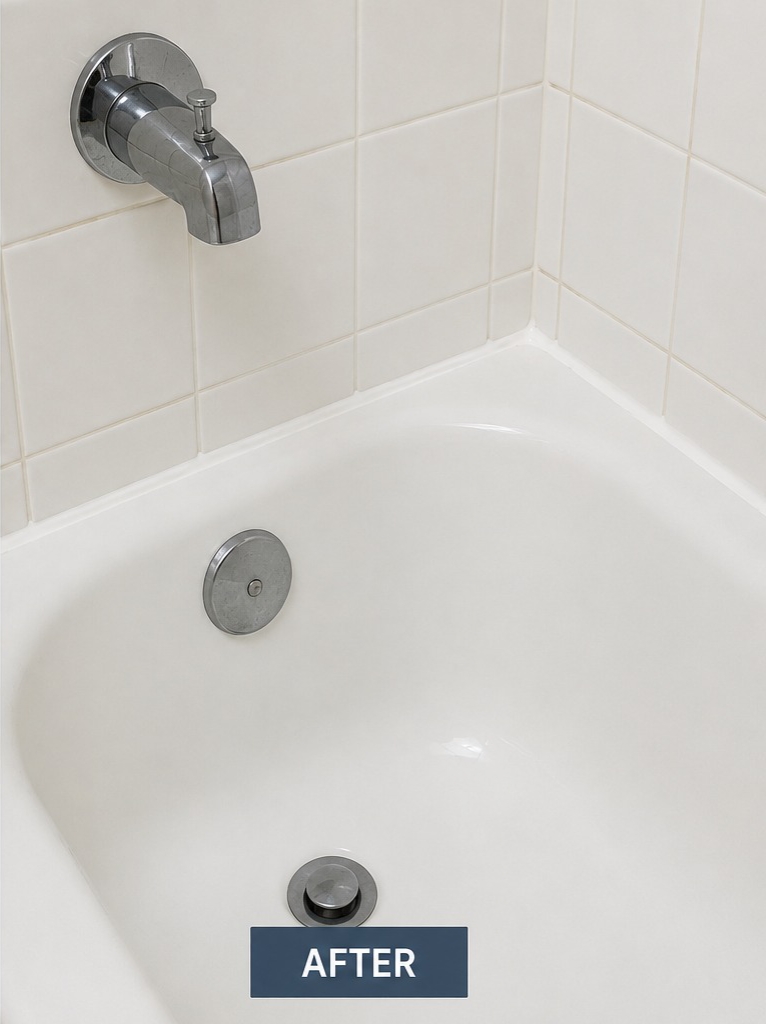
Bathtub & Shower Caulking
Sealing bath joints with premium waterproof silicone to protect against structural water damage and mildew.
Learn more & Before/After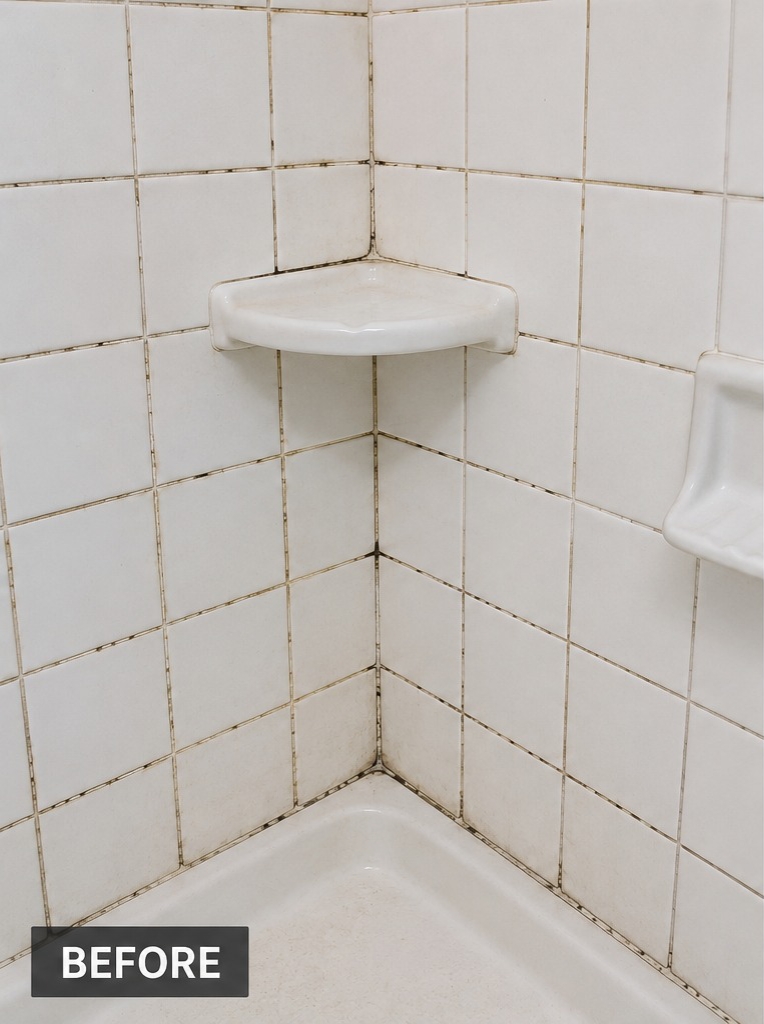
Grout Restoration
Revitalize floor and wall grout back to original white, slate, or custom colors with advanced epoxy sealers.
Learn more & Before/After
Tile & Grout Cleaning
Deep dirt extraction using heavy-duty high temperature cleaning tools that sanitize and lift decades of residue.
Learn more & Before/AfterPraised by Detail-Oriented Homeowners
Precision Restoration Services
We do not just cover up issues; we perform complete deep-clean, remediation, and high-performance sealing designed to last.
Bathtub & Shower Caulking
Old silicone joints split and accumulate mold, letting water leak into floorboards. We lay immaculate sanitary beads that stay beautiful.
- Premium Silicone: 100% waterproof grade silicone resistant to color fading.
- Anti-Mold Treatment: Sealed surface stays dry and prevents future mildew spores.
- Flexible Seal: Expands and contracts with tub shifting to prevent splits.
Grout Restoration & Coloring
Porous grout absorbs grease, soap scum, and moisture, causing staining. We steam extract deep dirt and seal with colorized epoxy protectants.
- Stain Protection: High-performance sealants lock out oils and future spills.
- Color Matching: Custom colors available to accent your designer tiles.
- Sanitary Defense: Closes grout pores so bacteria cannot breed.
Homesealers Pro – Service Process
We follow a rigorous, standardized multi-step process for each service to guarantee a flawless finish and long-lasting seal.
Bathtub Caulking Process
Ensuring an airtight, mold-resistant seal around your bathtub joints.
Initial Assessment
Inspect the existing caulking and surrounding surfaces.
Clean Removal
Remove all old silicone using professional tools.
Deep Cleaning
Clean the area thoroughly to remove soap scum, dirt, and residue.
Anti-Mold Treatment
Apply a mold and mildew treatment solution.
Complete Drying
Allow the surface to dry completely.
Silicone Application
Apply premium 100% waterproof silicone.
Smooth & Tool
Smooth and finish the caulk line for a clean, professional appearance.
Inspection & Cleanup
Final quality inspection and cleanup.
Shower Caulking Process
Preventing water damage with specialized watertight joints and corners.
Joint Assessment
Assess all shower joints and corners.
Debris Extraction
Remove old or damaged caulking.
Surfaces Prep
Deep clean the joints and surrounding tiles.
Mold Eradication
Treat any mold or mildew present.
Drying Phase
Dry the surface completely.
Silicone Application
Apply new mildew-resistant silicone.
Smooth Seal
Tool and smooth the silicone for a durable, watertight seal.
Quality Check
Inspect the finished work and clean the area.
Kitchen Sink Caulking Process
Creating clean, waterproof seals around high-moisture kitchen surfaces.
Stripping Old Seal
Remove deteriorated caulking around the sink.
Degreasing & Cleaning
Clean away grease, soap residue, and debris.
Sanitization
Sanitize and dry the surface.
Waterproof Sealing
Apply high-quality waterproof silicone.
Bead Tooling
Smooth the bead for a neat finish.
Final Verification
Perform a final inspection.
Bathroom Sink Caulking Process
Keeping bathroom vanity surfaces hygienic and waterproof.
Seal Removal
Remove old caulking.
Disinfection
Clean and disinfect the area.
Sanitation Rinse
Treat any mold or mildew.
Drying Stage
Dry the surface completely.
Silicone Laying
Apply fresh silicone.
Final Polish
Finish with a smooth, clean seal.
Kitchen Counter Caulking Process
Providing seamless, hygienic borders for your countertops and backsplashes.
Joint Inspection
Inspect countertop joints and backsplashes.
Removal Phase
Remove cracked or peeling caulking.
Surface Preparation
Clean and prepare the surfaces.
Premium Sealing
Apply premium silicone sealant.
Seamless Tooling
Smooth the joints for a seamless appearance.
Cleanup & Inspection
Final cleanup and inspection.
Grout Cleaning Process
Deep dirt extraction that sanitizes and lifts decades of embedded residue.
Condition Analysis
Inspect grout condition and identify stains.
Debris Removal
Sweep or vacuum loose debris.
Solution Application
Apply a professional grout-cleaning solution.
Deep Agitation
Agitate grout lines with specialized brushes or equipment.
Extraction & Rinse
Steam clean or rinse thoroughly (when appropriate).
Mold Sanitizing
Remove dirt, soap scum, mold, and mildew.
Final Inspection
Dry and inspect the grout lines.
Spot Grout Repair Process
Replacing damaged, missing, or cracked grout to preserve floor integrity.
Defect Identification
Identify cracked, missing, or damaged grout.
Damaged Removal
Remove loose grout from affected areas.
Joint Prep
Clean and prepare the joints.
Color-Matched Filling
Apply color-matched grout.
Shaping & Smoothing
Shape and smooth the grout lines.
Curing Stage
Allow proper curing time.
Residue Cleanup
Clean residue and perform a final inspection.
Grout Restoration Process
Bringing stained and faded grout lines back to pristine conditions.
Grout Evaluation
Inspect the condition of existing grout.
Deep Steam Clean
Deep clean all grout lines.
Stain & Mold Removal
Remove stains, mold, and discoloration.
Grout Repairs
Repair damaged or missing grout sections.
Color Recoloring
Restore grout color where needed.
Protective Sealing
Apply a protective sealer (optional or as requested).
Quality Check
Conduct a final quality check.
Tile Cleaning Process
Restoring tiles to their original glow with specialized high-temperature cleaners.
Material Assessment
Assess the tile type and condition.
Loose Dirt Sweep
Remove loose dirt and debris.
Solution Spray
Apply a professional tile-cleaning solution.
Power Scrubbing
Scrub using specialized brushes or equipment.
Steam Extraction
Steam clean or rinse thoroughly.
Dry & Polish
Dry and polish the tiles.
Final Polish Check
Inspect for a uniform, clean finish.
Mold Treatment Process
Eradicating mildew and mold at the roots with safe, heavy-duty sanitizers.
Mold Mapping
Inspect and identify mold-affected areas.
Surface Protection
Protect surrounding surfaces.
Fungicide Treatment
Apply a professional mold-removal treatment.
Stain Cleaning
Remove mold, mildew, and surface staining.
Disinfection
Sanitize and disinfect the area.
Dry & Evaluate
Allow the surface to dry completely.
Remediation Check
If mold has penetrated the silicone, recommend complete silicone removal and replacement.
Preventative Care
Provide moisture-prevention and recommendations.
Surface Estimation Calculator
Input your parameters to get an instant, transparent price estimate. No surprise charges.
Estimated Pricing Summary
Instant QuoteEstimate is non-binding. Final pricing verified on-site during inspection.
Schedule Restoration Work
Choose your service details and pick an open slot that fits your schedule.
Connect With Home SealerPro
Have custom tiles, commercial queries, or unique layouts? Contact our specialists directly.
Contact Channels
We typically respond to requests and emails within 2 business hours.


Greater Toronto Area (GTA) Toronto
North York
Oakville
Mississauga
Brampton
Vaughan
Markham
Richmond Hill
Scarborough